Listen Audio Version
Getting your Trinity Audio player ready... |
Major VPN services offer software for desktop or mobile. Instead of getting the software, you can install and set up a VPN on Windows 11, which means VPN software is not necessary for using that VPN.
In today’s topic, I will tell you how to set up a VPN on Windows 11. It contains pros and cons as well that also I will cover, but first, let’s discuss how to install a VPN on Windows 11.
Post Contents
Why Use a VPN on Windows 11?
Normally, VPNs are used to boost your security and privacy. And, the purpose of using a VPN on Windows 11 remains the same. Connecting with a VPN transmits the internet traffic through an encrypted tunnel between your device and the VPN server.
It allows you to access private networks, geo-restricted content easily. Even it restricts people from stealing your data. You can use a VPN easily whenever you want.
Although VPN providers offer their software for desktops and mobiles, you don’t have to use it. You can set up a VPN on Windows 11 directly instead of processing VPN software. First, learn about how to set up a VPN on Windows 11.
Should You Use a Free or Paid VPN?
Paid VPNs are always the best option. Using a free VPN for a pinch of time is fine. But, you should go for a paid VPN for long-term use. NordVPN, Surfshark is some of the best subscription-based VPNs.
How to Set Up a VPN on Windows 11
Similar to its predecessor, you can set up a VPN on Windows 11. The given steps are used to set up NordVPN. Once learn how to set up a VPN on Windows 11, and you can easily set up any VPN provider on your device. Let’s begin today’s how-to tutorial.
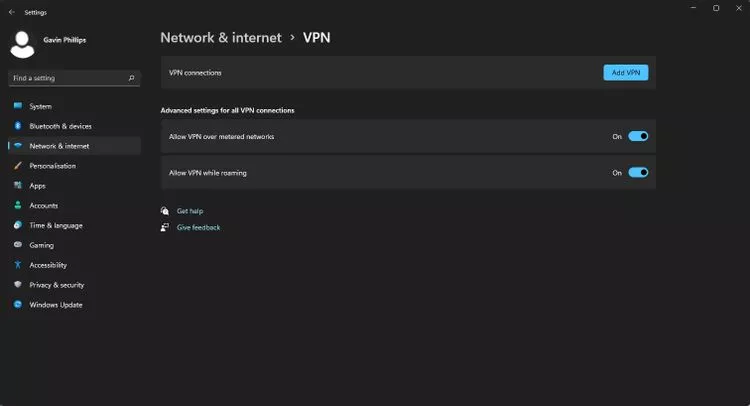
Type VPN in the search bar of your Start Menu. Then, select the best match and follow the given steps.
- Select ‘Add VPN’ in the VPN connection.
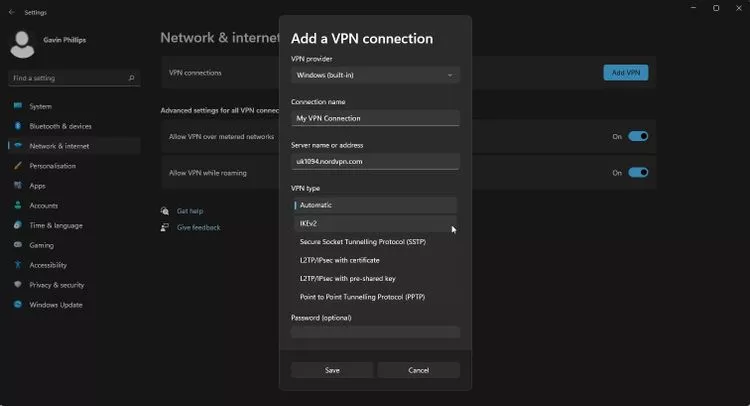
- Next, select ‘Windows (built-in)’ from the list of given VPN providers.
- Now, write a ‘Connection Name’ as per your choice. It doesn’t have to match with the specific server name or your VPN server name.
- After that, add a ‘Server Name or Address’ that can be found on the website of your VPN provider. To find a specific server, search for ‘[VPN provider name] server IP addresses’ or ‘[VPN provider name] host names’.
- Then, select the ‘VPN type’. Generally, L2TP/IPsec type VPN is used but you may need to configure it to connect to a different server. That’s why check your VPN provider and change the setting according to it.
- Finally, you need to put your VPN username and password for sign-in. However, some VPNs provides a username and password that you need to note down for manual configuration. You will find the manual configuration option in the VPN settings.
- Hit the ‘Save’ option to store all the given inputs.
The following instructions will work for most VPN providers. Some services may provide specific quirks like different usernames and passwords and other service-specific settings.
How to set up an IKEv2 VPN on Windows 11
An IKEv2 VPN connection has a different configuration compared to the commonly used L2TP/IPsec protocol. This VPN requires the installation of a security certificate and has a few more steps in set up. IKEv2 is considered one of the strongest and most stable VPN protocols. Asking for exceptional security, then IKEv2 is worth using.
Once it was difficult to find support for IKEv2 VPN connections, but now major VPN providers support the protocol. Also, they provide detailed instructions for their specific service. Follow the given steps to set up IKEv2 VPN on Windows 11.
- If your VPN provider supports IKEv2 VPN, then they must have a certificate of specific download and support. Go to your VPN service and download that certificate.
- Double click on that certificate as soon as it is downloaded and click to install it with the Certificate Import Wizard.
- Then, select ‘Local Machine’ and click ‘Next’ to continue.
- After that, select the ‘Place all certificates’ in the given store and click ‘Browse’.
- Next, select ‘Trusted Root Certification Authorities’ and click ‘OK’.
- Click ‘Next’ after returning to the Certificate Import Wizard.
- Now, click ‘Finish’ and then ‘OK’.
- Once all set, follow the previous instructions to set up a VPN on Windows 11. But, switch the ‘VPN type’ to IKEv2 VPN.
Also, read ????

Top 7 Common VPN Scams & How to Avoid Them – Enchantrixto????????????????????
Top 7 Windows 11 Laptops That You Must Have????????????????????
Pros and Cons to Manual VPN Configuration
Every technology has its merit and demerit points. Similarly, it also has a few pros and cons to consider. Let’s check out them.
Pros
- It offers lots of open-source tinkering, extensive customization options, and more direct control over the VPN.
- It captures less space on your computer.
- If you are using the same VPN protocols, it will deliver a secure connection as the desktop and mobile VPN software.
Cons
- For the new VPN users, it’s difficult to configure and maintain.
- Some extra connection modes and additional security features are absent compared to the desktop and mobile software.
Final Words on How to Set up a VPN on Windows 11
After considering all, using a VPN provider’s dedicated software is the best option. As it connects to their servers easily and switching between servers becomes simple. Also, you will get most apps with additional security features.
On the other hand, you can manually set up a VPN on Windows 11. Now, it’s totally up to you, whether you choose the manual set-up or VPN provider client. But, must have all the options available.
I hope you will now know how to set up a VPN on Windows 11. Share it to make others aware about how to set up a VPN on Windows 11. Comment and let me know how it went for you. If you know some other way, share that in the comment section.
Set up a VPN on Windows 11 – FAQs
1) What are free VPNs work with Windows 11?
Some of the best free VPNs are ProtonVPN, TunnelBear, Windscribe, and Hide.me that work with Windows 11.
2) Does NordVPN support Windows 11?
Yes, NordVPN can run on Windows 11 without any problem. NordVPN is one of the best VPNs and most used VPN in the Industry.
3) How do I set up a VPN on my computer?
Click on the ‘Windows Logo’, then go to ‘Settings’. Next, click on ‘Network & Internet’ and select ‘VPN’. Now, click on ‘Add a VPN’ and follow the above-given steps described in today’s topic to know in detail.
4) How do I find my VPN IP address Windows 11?
Click ‘Network & Internet’ and select ‘Wi-Fi’ if you are connected wirelessly or ‘Ethernet’ in case you are using an ethernet cable. Then, click on ‘Network’ or ‘Network and Sharing Centre’ in the middle column. Your IP address will appear on the IPv4 address in the next window.
5) Does Windows have a free VPN?
Windows comes with an in-built VPN able functionality. Without any charges, it offers a point-to-point tunnelling protocol (PPTP).