Listen Audio Version
Getting your Trinity Audio player ready... |
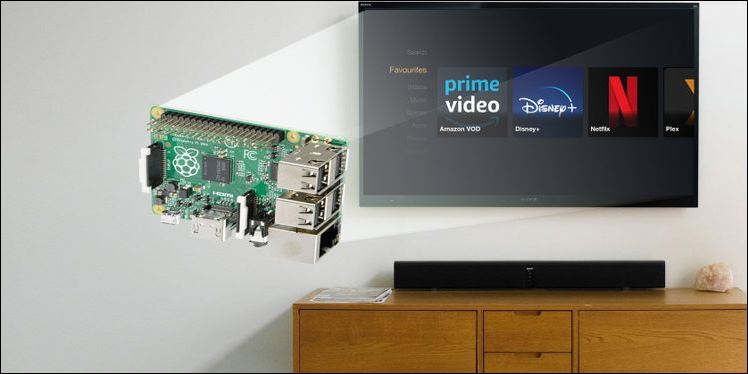
With the continuous up-gradation of Raspberry Pi over the years, the super-popular single-board computer (SBC) has become more powerful. The latest Raspberry Pi 4 is powered by a beefier processor with faster DDR4 RAM. It becomes more competent to handle day-to-day tasks like writing, web browsing, editing, podcasting, and photo editing. Especially, it excels on the multimedia playback feature to video stream with Raspberry Pi.
Local file playback works great to stream with Raspberry Pi. But, the Raspberry Pi 4 supports the Widevine package officially. However, the lack of Widevine support restricts Raspberry Pi from streaming online. In today’s topic, I will tell you how to stream with Raspberry Pi.
Also, read????
Post Contents
Video Stream with Raspberry Pi
Before going further, you will have to consider Raspberry Pi 4 or at least a Raspberry Pi 3 model to stream with Raspberry Pi. If you have ever tried to stream online via Kodi, then you must know about the problems due to a combination of poor add-ons (or ones that work with desktop PC Kodi installations). To resolve these problems, you should go with a Raspberry Pi 4.
Benefits of Using Raspberry Pi as a Multimedia Player
- It is cost-effective.
- Also energy-efficient.
- It supports lots of media server software.
- Runs in all the operating systems including Linux.
- Easy to set up and has a small physical footprint.
What is Kodi?
Kodi is an open-source media player software application. It is developed by XBMC Foundation. Kodi operates in multiple operating systems to offer your favorite movies, music, and games. It can convert your normal TV to a smart TV with Raspberry Pi. You can flash OSMC, Open ELEC, Libre Elec, etc., on your micro SD card to get Kodi on Raspberry Pi.
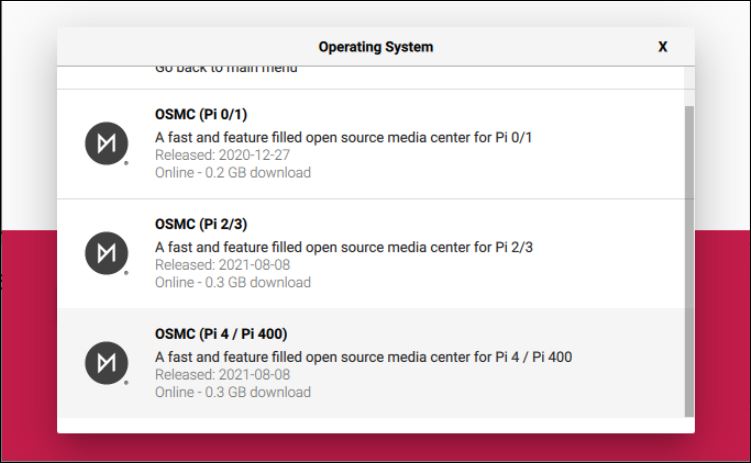
Install Kodi on Raspberry Pi with OSMC
To stream with Raspberry Pi, you will need to use OSMC (Open-Source Media Centre). OSMC is one of the various Kodi versions available for Raspberry Pi. There are three options available for OSMC installation.
Use the OSMC Installer
Download the installer from osmc.tv site. It makes the process of writing OSMC automated to your micro SD card. It is available for Windows and Mac OS. Make sure to select the most recent OSMC build while working through the installer. You may like to set up a wireless network while prompting.
Use the Raspberry Pi Imager
You can also install OSMC, using the Raspberry Pi Imager. The official Raspberry Pi site provides OSMC to install in various operating systems, including OSMC for Raspberry Pi 4.
At first click on ‘Choose OS’, then select ‘Media player.’ After that, choose ‘Kodi OS’ to select the ‘OSMC’ version for your Raspberry Pi model. Then select the storage device to save and click ‘Write.’
Download the Disk Image
The last option is to download the disk image for OSMC. You can find it by scrolling down the same page as the installer. It offers the right version for your Raspberry Pi model. Then, complete the installation by using your preferred micro SD card writing software.
Boot OSMC on Your Raspberry Pi
Install OSMC in your SD card and eject safely from your PC. Then, insert the SD card into your Raspberry Pi. Connect your computer with the router via Ethernet and TV’s HDMI port. Then, connect the power cable.
It will boot your Raspberry Pi into OSMC’s automated installer. Now, you have to wait for the installation of files and reboot the system. After reboot, OSMC will open with a Kodi media center on your Raspberry Pi.

Some basic configurations like language, time zone, device hostname, and enable or disable SHH are required to fill up. You can update OSMC before using it.
To check for any updates, go to ‘Settings,’ then click on ‘My OSMC.’ After that, click ‘Updates‘ and press on ‘Manual Controls.’ There you can see the ‘Scan‘ option; click to check for updates.
If there is any update, then wait for completing the update and OSMC reboots. When all is done, you are ready to stream with Raspberry Pi.
Install and Configure Plex for Local Media Streaming
You have to install the Plex server on your PC and install the add-on in the Raspberry Pi to stream with Raspberry Pi on Netflix, Amazon Prime Video, and Disney+ Hotstar.
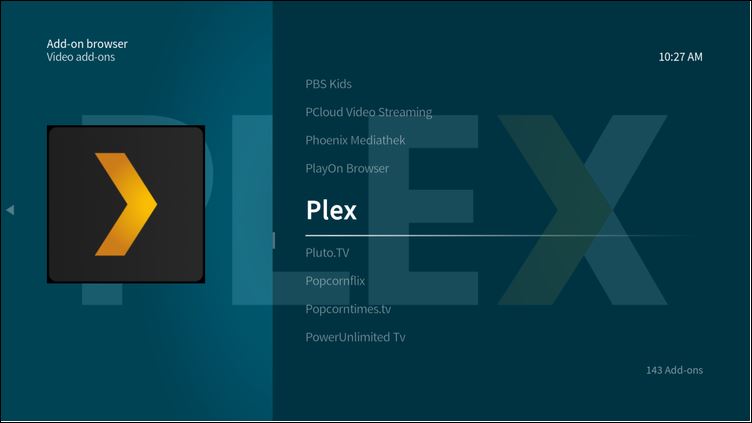
✅ Go to ‘Settings.’
✅ Search ‘Add-on browser.’
✅ Select ‘Install‘ from Repository and click ‘Video add-ons.’
✅ Find and select Plex in the list.
✅ Click ‘OK‘ to confirm and ‘Install‘ it.
✅ Wait for completion, then restart to reboot the Raspberry Pi.
During the restart, learn about Plex settings and using methods. When the Raspberry Pi restarts, use the Plex add-on to connect the Plex server to your network.
Install and Configure Netflix to Stream with Raspberry Pi
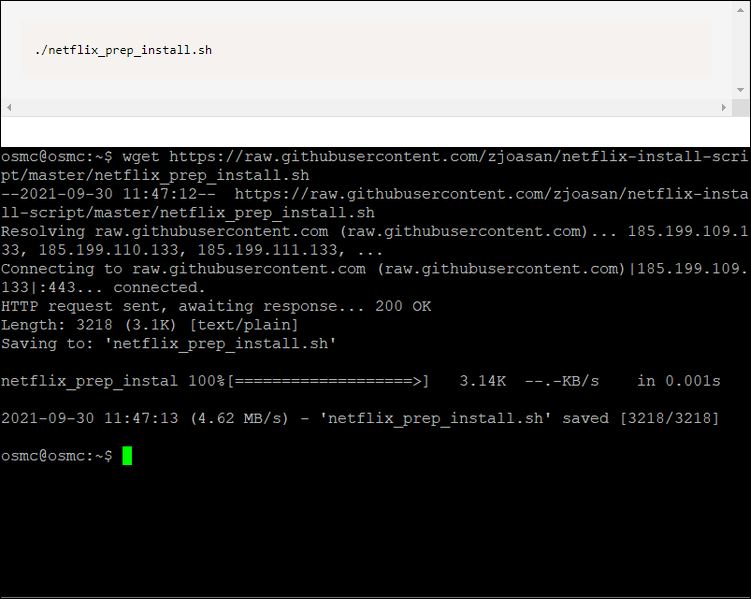
To install Netflix on your Raspberry Pi, connect over SSH and download the installation script.

After that, make the script executable.

Then, run the script.
Enter ‘Y‘ after prompted. Select ‘OK‘ for configuration of the software to run Netflix on the Raspberry Pi.
If it doesn’t happen, restart OSMC. Then, turn on your TV using OSMC and follow the given steps.
✅ Go to ‘Settings‘, and click on ‘Add-on browser.’
✅ There, select ‘Install from Zip File.’
✅ Tap ‘Yes‘ to proceed.
✅ Open ‘Root filesystem.’
✅ Then, browse to home, click OSMC, and press addons.
✅ Select ‘Netflix-repo.zip‘ and click ‘OK‘ to install.
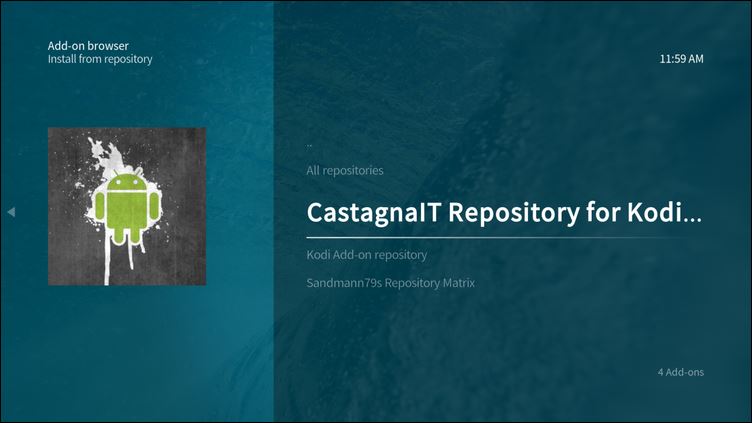
After the installation of the CastagnaIT Repository, click back. Then choose ‘Install‘ from the repository and follow the steps.
✅ Select ‘CastagnaIT Repository‘ for Kodi 19.x (MATRIX)
✅ Select ‘Video add-ons‘ and click on ‘Netflix‘ to install.
Reboot OSMC again when the installation has been completed. You need to configure the add-on with Netflix credentials while running with OSMC.
To do that, select ‘Videos‘ and click on ‘Video add-ons.’ After that, select ‘Netflix‘ and choose login method either email and password or authentication key.
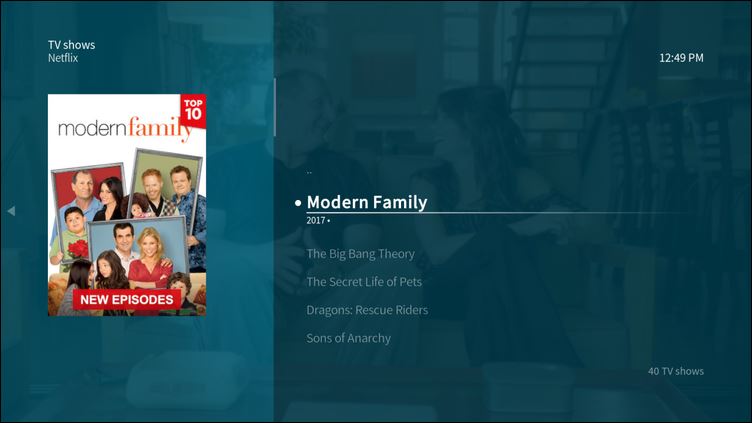
After logging in successfully, you can select your profile and watch the movies and shows. You will get the same menu as Netflix App.
However, you will have to install Widevine first, to play any media. Here, you need to enable the Input Stream module. Go to ‘Settings‘ and select ‘Add-on browser‘, then click on ‘My add-ons‘, and find ‘Video Player Input Stream.’ After that, select ‘Input Stream Adaptive.’
Open the ‘Configuration‘ and set ‘Max Resolution‘ for the general decoder and secure decoder same as your TV. Then, click ‘OK‘ to confirm and exit. Your Raspberry Pi is successfully turned into a media center running Netflix.
Install and Configure Amazon Prime Video on Raspberry Pi
To stream Amazon Prime Video on your Raspberry Pi, open a terminal or SSH client at first on your PC and connect to the Raspberry Pi. You have to search for the IP address in OSMC via going to ‘Settings‘ and clicking on ‘System Info.’
Use your username and password to connect to the SSH client. Then, use the wget to download the ZIP file. After that, go back to OSMC and follow the steps to enable the unknown sources.

✅ Open ‘Settings.’
✅ Then, select ‘System‘ and click ‘Add-ons.’
✅ After that, select ‘Unknown Sources‘
✅ Now, click ‘Yes‘ to confirm.
Now, you can install third-party software that is unavailable via Kodi. After doing it, install the repository.
✅ Open ‘Settings.’
✅ Select ‘Add-on browser‘ and click on ‘Install from Zip File.’
✅ Proceed while prompting and select ‘Root filesystem.’
✅ Browse to home, select OSMC and click on ‘repository.sandmann79-py3.plugins-1.0.0-matrix.zip‘
After the unpacking, you must browse back a screen and follow these steps below.
✅ Select ‘Install from repository‘ and click on ‘Sandmann79s Repository Matrix.‘
✅ Then, choose ‘Video add-ons.’
✅ Nest, select ‘Amazon VOD‘ and click on ‘Install.’
✅ While prompting, click on ‘Agree‘ to install additional software

Wait, until it is finished. Then, reboot the Raspberry Pi. Sign in and configure the add-on when it restarts.
✅ Go to ‘Settings‘ and click on ‘Add-on.’
✅ Then, go to ‘My Add-ons‘ and click ‘Video Add-ons.‘
✅ Next, select ‘Amazon VOD.‘
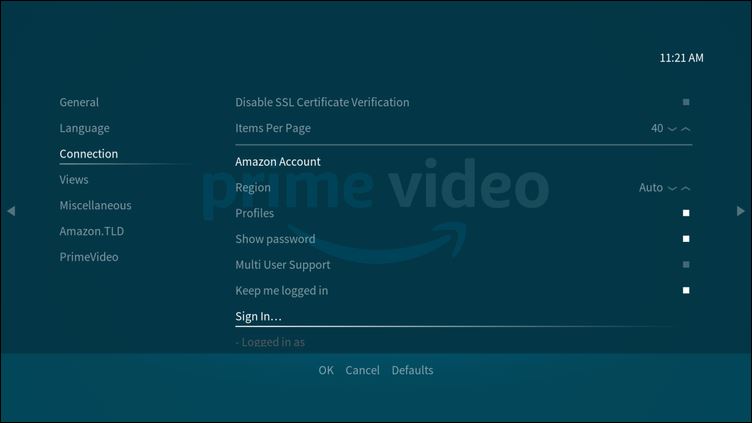
✅ Go to ‘Configure‘ and select ‘Connection.‘
✅ After that, sign in to your ‘Amazon Account‘ by entering your login ID and password. If there is two-factor authentication then you need to input an OTP also.
✅ Click ‘OK‘ to continue after successfully signing in.
You have to select the correct Input Stream configuration. So that, your Raspberry Pi receives video data. Configure the settings as stated.
✅ Go to ‘General‘ and click on ‘Input Stream Addon Settings.‘
✅ Then, enable ‘Override DHCP Status.‘
✅ Next click ‘OK‘ to confirm.
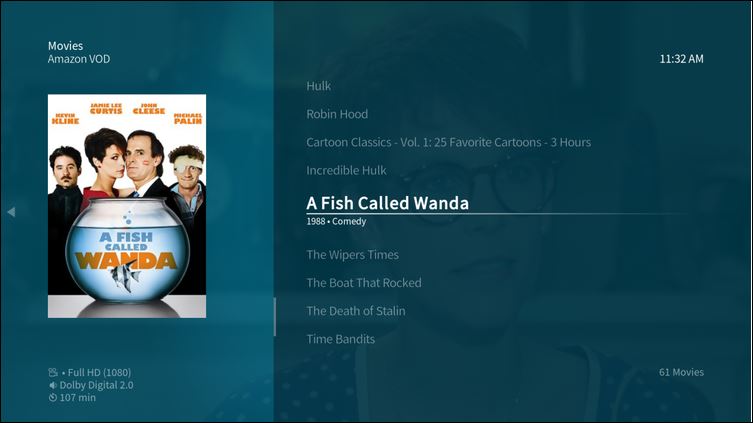
Now, you are ready to watch Amazon Prime Video on your Raspberry Pi. You have to set up ‘Amazon VOD‘ which will get listed in Videos. Then, select ‘Video add-ons.‘ Finally, you can watch everything you want.
Install and Configure Disney+ to Stream with Raspberry Pi
You need to install a new repository to install Disney+ on your Raspberry Pi and run with the OSMC build of Kodi. Before that, enable unknown sources (stated earlier).
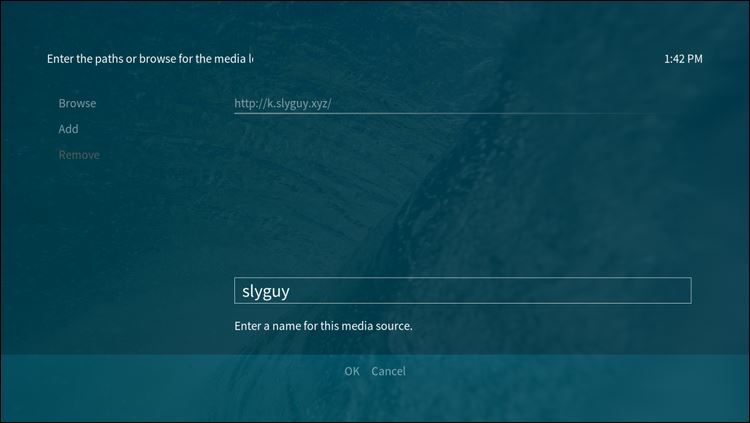
✅ Go to ‘Settings‘ and select ‘File manager.’
✅ Then, select ‘Add source‘ and click into the ‘None field.’
✅ Put the URL “http://k.slyguy.xyz” there and name the media source as ‘slyguy‘, then click ‘OK‘ to do.
✅ After that, go back and open ‘Settings‘ to select ‘Add-on browser.‘
✅ Next, choose ‘Install from ZIP file‘ and click ‘Yes‘ to agree.
✅ Select ‘slyguy‘, then click on ‘slyguy.zip‘ to install it.
✅ Wait until the repository has been installed successfully. Now, you can run Disney+ Hotstar on the Raspberry Pi. To install Disney+ Hotstar on OSMC follow the steps given below.
✅ Choose ‘Install from repository‘ and select ‘SlyGuy Repository.’
✅ Then, search ‘Video add-ons‘ and find Disney+ Hotstar from the list.
✅ Click on ‘Install‘, then press ‘OK‘ to confirm dependencies during installation.
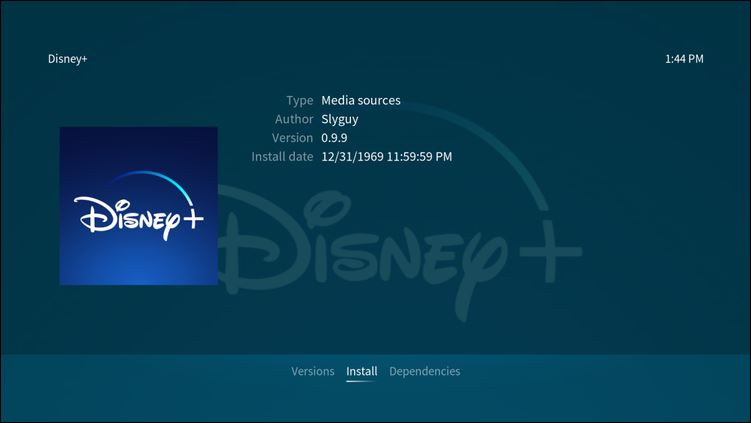
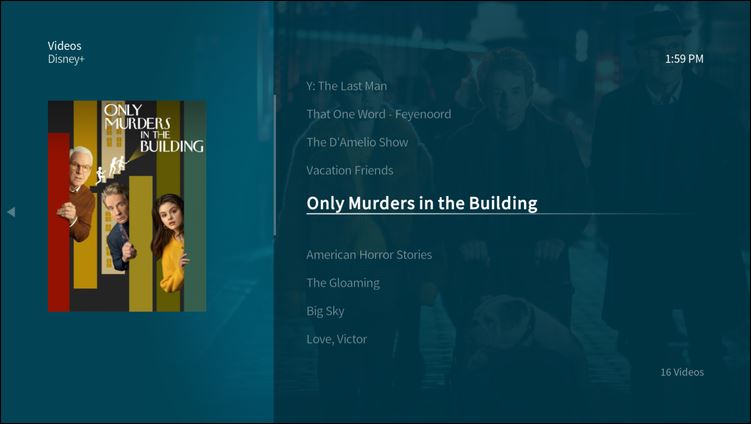
After the installation of Disney+ has finished, go to ‘Videos‘ and launch the add-on. Now, log in with your ID and start the use of Disney+ on your Raspberry Pi.
You have to select Widevine CDM to watch movies, TV shows, etc. A different version is also available. You can choose the bitrates offered by the Disney+ add-on to enjoy the best quality feed for your connection and TV.
Vidoe Stream with Raspberry Pi – Concluding Words
So, you can now stream with Raspberry Pi over Netflix, Amazon Prime Video, and Disney+. Also, you can easily stream video from another computer via Plex on your network. You can enjoy Disney movies, Star Wars, Marvel, and TV shows, thanks to the Disney Plus add-on. You can play retro video games also.
In short, a Kodi-based Raspberry Pi streaming box is made which is awesome. I hope this article must have enlightened you on how to video stream with Raspberry Pi.
Please share and comment and let me know how’s your experience with it and the processes to stream with Raspberry Pi. That’s all for now, I’ll be back with another topic soon. Till then subscribe to our newsletter and stay updated!
FAQs on Video Stream with Raspberry Pi
1) Can you use a Raspberry Pi to stream?
Yes, you can stream with Raspberry Pi. Supporting with Widevine DRM, you can comfortably stream Netflix, Amazon Prime, Disney+, Hulu, HBO Max, and Spotify with Raspberry Pi.
2) Is the Raspberry Pi 4 good for streaming?
Raspberry Pi can’t handle streaming video very well, even it is Raspberry Pi 4. You face sluggish and drop frames while streaming at full screen, no matter the resolution
3) Is Raspberry Pi easy?
No, Raspberry Pi isn’t as simple as plug-and-play.
4) Can a Raspberry Pi Run Steam Link?
The Steam Link app extends Steam Link functionality to the Raspberry Pi 3B and 3B+, running Raspbian Stretch.
5) Can a Raspberry Pi run Netflix?
After turning the Raspberry Pi into a Kodi-based Raspberry Pi streaming box, you can stream Netflix, Amazon Prime, Disney+ Hotstar, Hulu, HBO Max, and Spotify.